


Introduction
Hello my virtual friends, how are you? I’m fine, thank you. Whether you're a seasoned developer or a complete beginner who is interested in an easy way of setting up a GraphQL server from scratch, then this is the blog for you. For those that don’t know, GraphQL is an API query language that offers a fast and flexible way of organising your API requests around the data you want, rather than the structure of endpoints. However, GraphQL has quite a lot of overhead to set up.
I recently experimented with a few tools that make the process of setting up GraphQL much easier. I was particularly interested in TypeGraphQL as it uses classes and decorators to build your schema. This solves the problem I’ve had in the past of having to maintain large and verbose schema files as well as long lists of data types. I thought I would give it a try and it’s been such a nice experience that I thought I would share some of my findings in the hope of making your GraphQL days a little brighter.
Project setup
Let's start by setting up a basic TypeScript project. For this, we will be using Yarn for the package manager:
mkdir simple-graphql-server
cd simple-graphql-server
yarn init
Install initial dependencies. For the sake of compatibility, I will specify explicit package versions for this example:
yarn add --dev @types/node@17.0.18 typescript@4.5.5 ts-node@10.5.0
Create a tsconfig.json file, required for tsc and ts-node to compile TypeScript to JavaScript.
{
 "compilerOptions": {
   "target": "es2018",
   "module": "commonjs",
   "lib": ["es2018", "esnext.asynciterable"],
   "experimentalDecorators": true,
   "emitDecoratorMetadata": true,
   "esModuleInterop": true
 }
}
Getting data
Next, we need some data. For this I’m using the PokeAPI just because it’s amazing. Let’s create a service for retrieving pokemon data by name or ID.
Install axios, this is a promise based http client that we will use to make a request to the PokeAPI:
yarn add axios@0.26.0
Create file: src/pokemon-service/pokemon-service.ts
import { AxiosInstance } from 'axios';

export interface Pokemon {
 id: number;
 name: string;
 types: string[];
 imageURL: string;
}

interface PokemonType {
 slot: number;
 type: { name: string; url: string };
}

interface PokemonSprites {
 front_default: string;
}

interface PokemonApiResponse {
 id: number;
 name: string;
 types: PokemonType[];
 sprites: PokemonSprites;
}

export class PokemonService {
 constructor(private client: AxiosInstance) {}

 async getPokemonInfo(pokemonNameOrId: string | number): Promise<Pokemon> {
   try {
     const response = await this.client.get<PokemonApiResponse>(
       `/pokemon/${pokemonNameOrId.toString().toLowerCase()}`,
     );
     const pokemon = response.data;
     const pokemonTypes: PokemonType[] = pokemon.types;

     const formattedPokemonTypes: string[] = pokemonTypes.map(
       (pokemonType) => pokemonType.type.name,
     );

     return {
       id: pokemon.id,
       name: pokemon.name,
       types: formattedPokemonTypes,
       imageURL: pokemon.sprites.front_default,
     };
   } catch (err) {
     if (err.response.status === 404) {
       throw new Error(`Pokemon cannot be found: ${pokemonNameOrId}`);
     }
     throw new Error(`Error retrieving pokemon details for: ${pokemonNameOrId}`);
   }
 }
}
What this is basically doing is making a request to the PokeAPI and mapping the response into a simpler format. Now that we have some data to work with, the next thing to do is start mapping out the data types and resolvers for our GraphQL server.
Using TypeGraphQL decorators
Install type-graphql, we also need graphql-js and class-validator which are peer dependencies of TypeGraphQL:
yarn add type-graphql@1.1.1 graphql@15.3.0 class-validator@0.13.2
We can now map out our data type using the @ObjectType() decoration.
Create file: src/resolvers/pokemon-type.ts
import { Field, ObjectType } from 'type-graphql';

@ObjectType()
export class PokemonGQL {
 @Field(() => String)
 id: string;

 @Field(() => String)
 name: string;

 @Field(() => [String])
 types: string[];

 @Field(() => String)
 imageURL: string;
}
This object type tells GraphQL what data structure we expect to receive from our newly created pokemon service. Now we can create a resolver using the @Resolver() decoration. At the same time we can also set up our first query using the @Query() decoration. Please note that mutations can be set up in the same way using @Mutation().
Create file: src/resolvers/pokemon-resolver.ts
import { Arg, ID, Query, Resolver } from 'type-graphql';
import { Pokemon, PokemonService } from '../pokemon-service/pokemon-service';
import { PokemonGQL } from './pokemon-type';
import axios from 'axios';

@Resolver()
export class PokemonResolver {
 constructor(private pokemonService: PokemonService) {
   this.pokemonService = new PokemonService(
     axios.create({ baseURL: 'https://pokeapi.co/api/v2' }),
   );
 }

 @Query(() => PokemonGQL)
 async pokemon(
   @Arg('pokemonNameOrId', () => ID) pokemonNameOrId: number | string,
 ): Promise<Pokemon> {
   return await this.pokemonService.getPokemonInfo(pokemonNameOrId);
 }
}
Creating the server
Finally, let's create the server itself. I’m going to use apollo-server-express as it enables you to attach GraphQL to an existing Express server. In case you are unfamiliar with Express, it’s the most popular Node.js web framework. For this we need to install the following packages:
yarn add apollo-server-express@3.6.3 express@4.17.3 reflect-metadata@0.1.13
We then pass our newly created resolver into the buildSchema function and It will automatically generate our GraphQL schema. Please note that we need to include reflect-metadata at the top of our entry file in order to make the type reflection work.
Create file: src/index.ts
import 'reflect-metadata';
import express from 'express';
import { ApolloServer } from 'apollo-server-express';
import { buildSchema } from 'type-graphql';
import { PokemonResolver } from './resolvers/pokemon-resolver';

const PORT = process.env.PORT || 4000;

const startServer = async () => {
 const app = express();
 const apolloServer = new ApolloServer({
   schema: await buildSchema({
     resolvers: [PokemonResolver],
   }),
 });

 await apolloServer.start();
 apolloServer.applyMiddleware({ app });

 app.listen(PORT, () => {
   console.log(`🚀 Server ready at: ${PORT}`);
 });
};

startServer().catch((err) => {
 console.error(err);
});
Our final project directory structure should look like this:
├── src
│   ├── index.ts
│   ├── pokemon-service
│   │   └── pokemon-service.ts
│   └── resolvers
│       ├── pokemon-resolver.ts
│       └── pokemon-type.ts
├── package.json
├── tsconfig.json
└── yarn.lock
Let's start our server:
ts-node src/index.ts
Visit http://localhost:4000/graphql and run our query on the GraphQL playground. Let’s use charizard as our argument:
{
 pokemon(pokemonNameOrId: "charizard") {
   id
   name
   types
   imageURL
 }
}›
And we get the following results:
{
 "data": {
   "pokemon": {
     "id": "6",
     "name": "charizard",
     "types": ["fire", "flying"],
     "imageURL": "https://raw.githubusercontent.com/PokeAPI/sprites/master/sprites/pokemon/6.png"
   }
 }
}
Now that's our GraphQL server all set up with very little fuss, pretty cool huh.
Conclusion
I hope this has been of some help. If this has tickled your interest, may I recommend you check out my example project where I connected this GraphQL server to a React App. I look forward to writing a follow up blog about this with some tips on how to automatically generate query and mutation functions from a GraphQL schema.
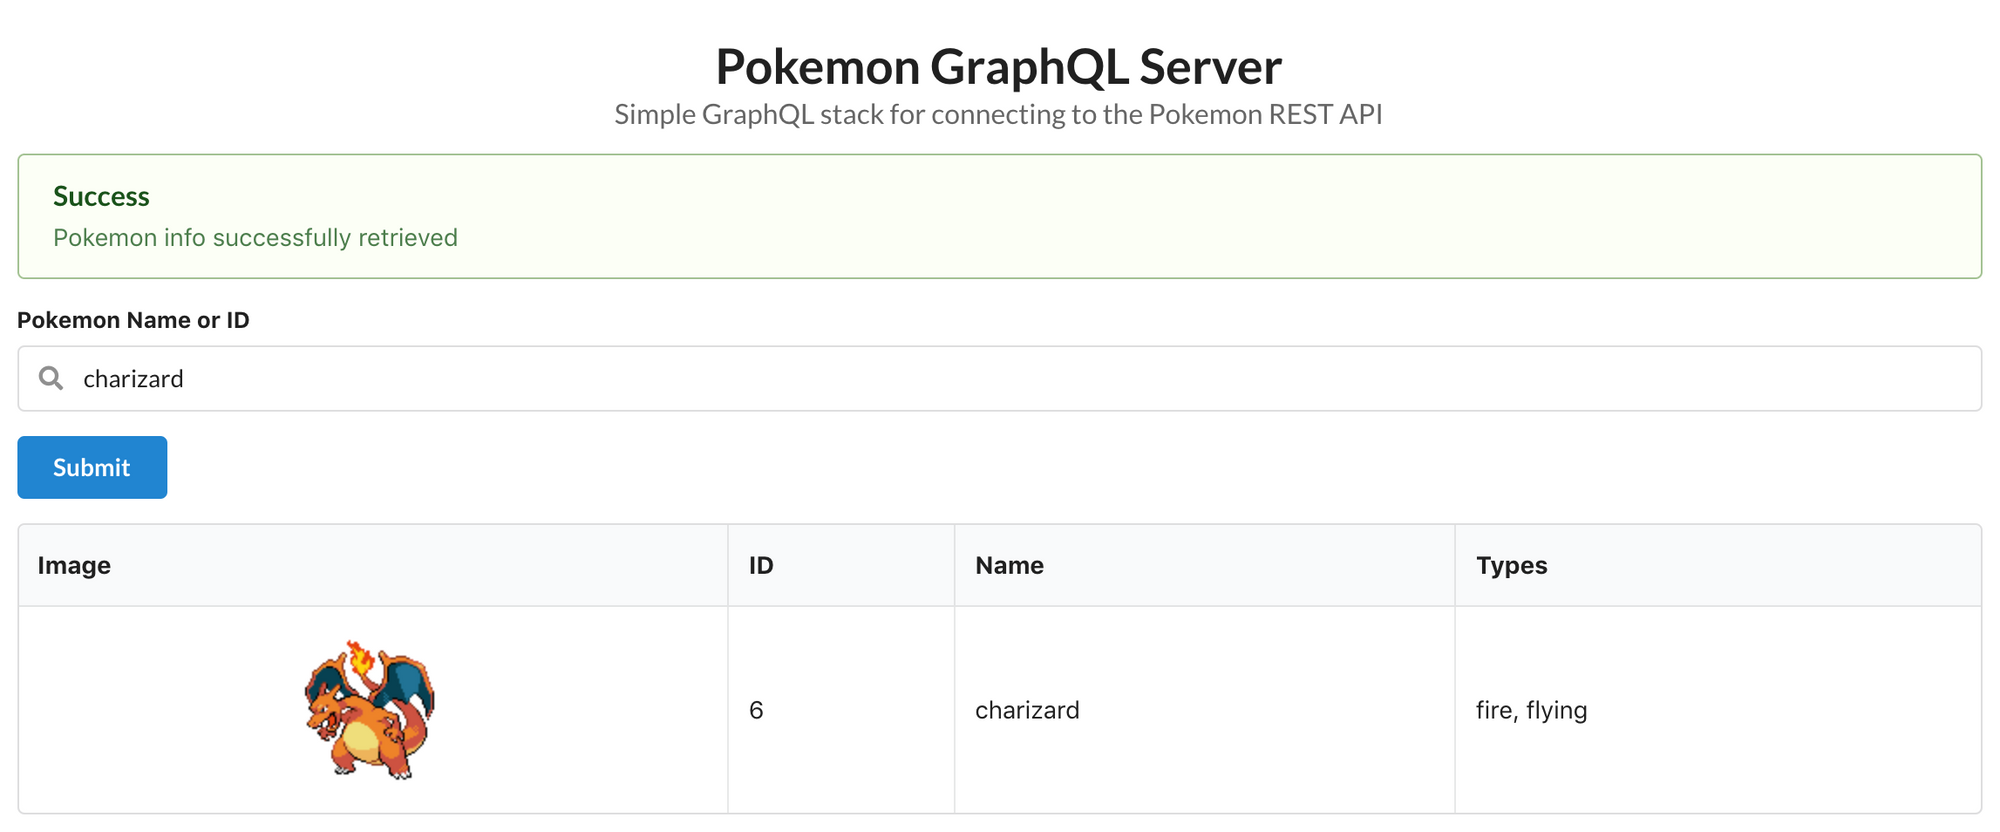
Example project screenshot:
Happy hacking :)